

W2P: How to Sync WooCommerce with Pipedrive – Complete Guide
Sync WooCommerce with Pipedrive using W2P. Learn how to automate orders, customers & deals seamlessly. 🚀
The W2P plugin allows seamless synchronization between WooCommerce and Pipedrive. Follow this guide to ensure proper setup and operation.
How Requests Are Sent to Pipedrive and How to Configure Them
The plugin's settings section is structured with separate tabs for Pipedrive categories: Person, Organization, and Deal.
For each category, you can configure custom parameters and hooks, which will be used to send data to Pipedrive.

1) Parameters
Person tabs
Link the WordPress user account to the Pipedrive organization if the Pipedrive person is already associated with one (recommended).
👉 This setting allows you to include the user’s organization ID in the request sent to Pipedrive when a person is created or updated.
If this option is enabled, the request payload to Pipedrive will contain the organization ID (see screenshot), ensuring that the person is correctly linked to their organization—provided the user on your site belongs to one.
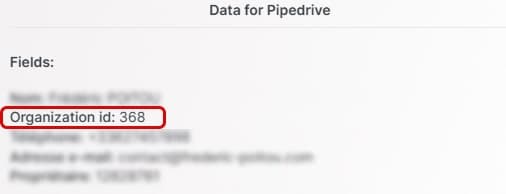
⚠️ If you attempt to send an organization ID that does not exist in Pipedrive (e.g., if the organization was deleted), you may encounter an error when creating or updating the person in Pipedrive.
Use the user's WordPress email as the name if no name is defined during the event (recommended).
👉 The email will only be applied if necessary when creating a person in Pipedrive. If needed, it will also be used to search for an existing person in Pipedrive associated with this email to avoid duplicates.
Deal tab
The following example illustrates how a default deal name is set within the plugin settings.

👉 This parameter allows you to set the default deal name when a deal is created or updated from a hook. This deal name can be overwritten if the "name" field is configured in a hook (event).
In this screenshot, you can see the default value for the deal name when the default parameters are loaded.
You can see an example of the value that will be sent based on your current settings (e.g., “WooCommerce order n° 6452“).
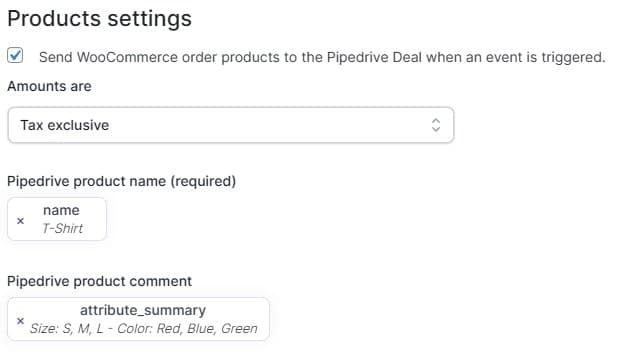
👉 You can choose whether to include products when sending a deal to Pipedrive. You can also set the default product name and comment to have them appear in the deals.
Additionally, you can define the tax type applied to product amounts in Pipedrive deals:
- Exclusive tax
- Inclusive tax
- None
2) Hooks (Event)
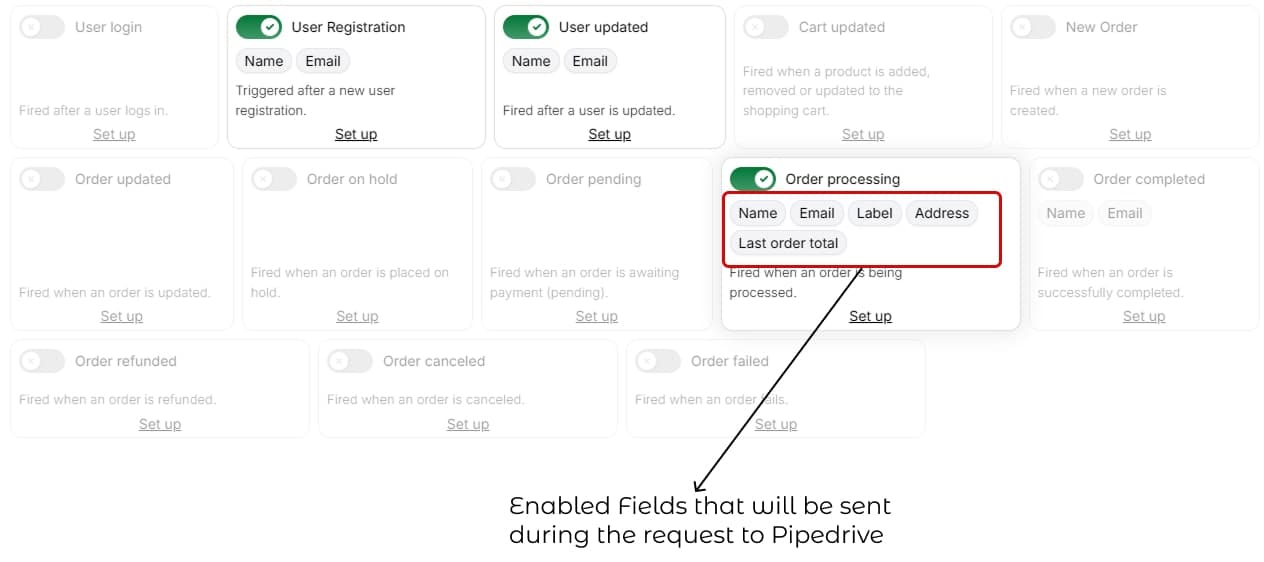
Each category allows you to enable hooks (events) that trigger a request to Pipedrive with the selected fields.
Some hooks may not be available for all categories, such as "User Register" for Deals.
Hooks are triggered by user actions on your site. For example, when a user registers, places an order, or updates their account details, the corresponding hook is triggered.
When a hook is triggered, the plugin automatically synchronizes the Pipedrive fields that have been configured for this specific hook (see section below).
This ensures that new customers, updated contact details, and order transactions are accurately reflected in Pipedrive without manual intervention.
3) Pipedrive Fields
Fields correspond to the custom attributes you"ve configured in Pipedrive, allowing you to categorize and filter entities.
Each category (Person, Organization, Deal) has its own set of fields in Pipedrive.
To load or reload Pipedrive fields, you can use the "Load/Reload custom fields" button. These fields are automatically loaded when you apply the default settings in general settings tab.
With W2P, you can enable or disable which fields will be updated or added in Pipedrive for the entity that triggered the hook.
For each hook in every category, you can define which values to update or add in Pipedrive for precise customization.
👉 For example, you can change the pipeline and status of a deal based on the triggered hook (e.g., "order processing → won", "order canceled → lost").

4) Define Field value
Field type
Depending on the field type, you can assign different types of values:
- Owner, Visible to: You can select a Pipedrive user ID.
- Label: You can select Pipedrive labels.
- Multiple Option: You can select one or more options configured in Pipedrive for this field.
- Single Option: You can select one option from those configured in Pipedrive for this field.
- Text, Date, Address, and other free-text fields: You can enter a custom value based on available WordPress variables (see below).
⚠️ We do not perform strict type validation on the values you assign. For example, if you set the variable "user_name" for a date field, you may encounter an error when sending data to Pipedrive.
Field Value
Free-text fields such as text, date, or address allow for advanced customization.
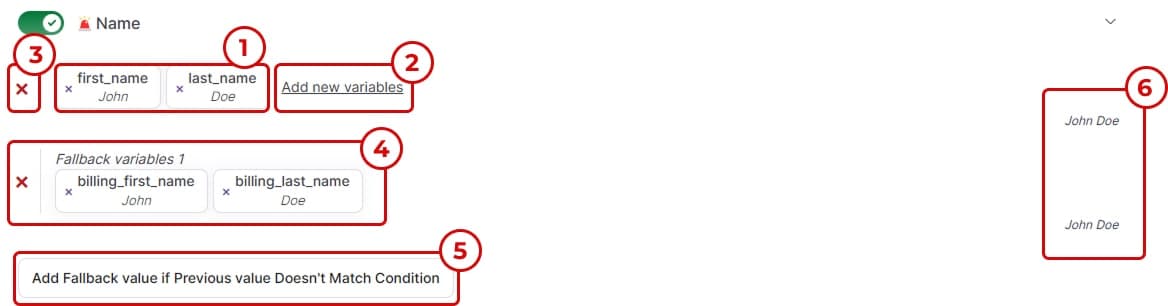
(1) List of variables used to compose the field value (e.g., the user"s first and last name).
☝️ Note: A space is automatically added between each variable, so you don"t need to manually insert one with a free text value.
You can easily remove a variable by clicking the cross icon or reorder them using drag and drop.
(2) Button displayed on hover, allowing you to add new variables (see next section).
(3) Button to completely remove the variable block.
(4) Fallback variable block. You can add as many fallback blocks as needed using button (5) “Add fallback value if the previous value doesn"t match the condition.“
☝️ Fallback values are particularly useful to ensure that data is sent to Pipedrive when you're unsure what variables the user has entered or when.
(6) Example of a value that will be assigned to the Pipedrive field when the hook is triggered.
Variables for Field Values
Click the “Add variable“ button to insert variables into the field value.
This will open a popup like the one shown below.
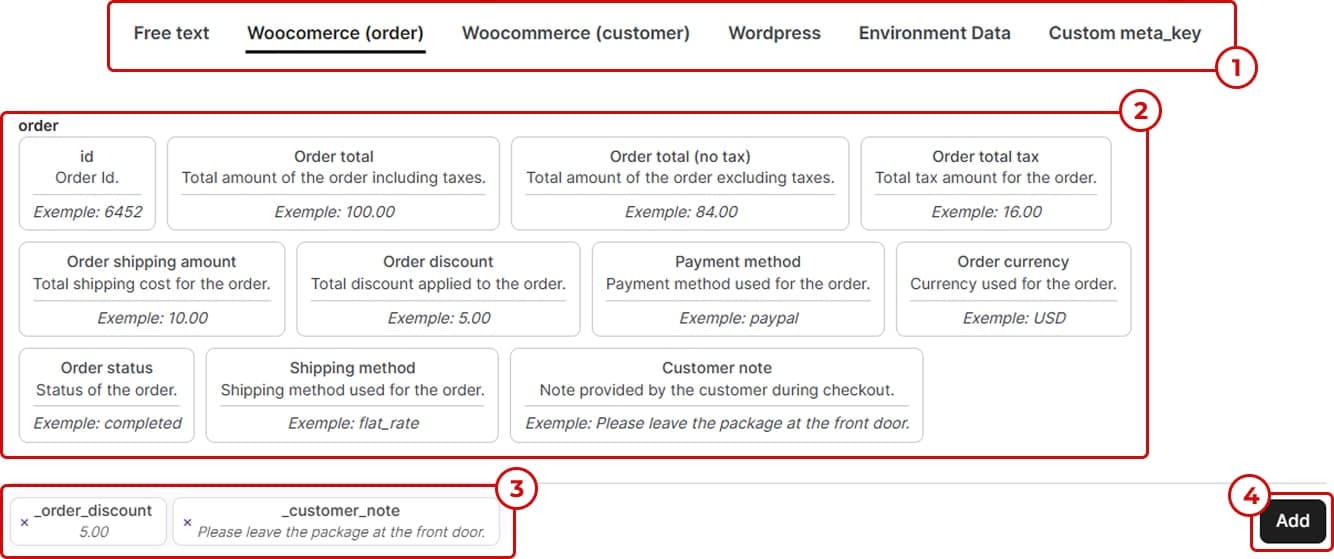
(1) Groups of available variables from WordPress and WooCommerce.
(2) List of all available variables within the selected group.
Simply select a variable to add it to the “Selected Variables“ section (3).
(3) The list of variables you have selected.
You can remove variables or reorder them using drag and drop.
(4) Button to confirm and insert the selected variables into the field value.
The “Free text“ group allows you to insert custom text, such as “WooCommerce order n°“.
The “Custom meta_key“ group lets you add any meta_key configured on your site via plugins or custom code.
Field Condition
Conditions allow you to define rules that determine when a field value should be sent to Pipedrive.
You can explore the available condition options in the interactive section above.
You can configure the field sending conditions as follows:
Always send the field value to Pipedrive, regardless of its content. In this case, fallback values will not be used.
⚠️ Note: If a field is empty, it will not be sent to Pipedrive.
Only send the field value to Pipedrive if at least one variable has a value.
☝️ This can be particularly useful when sending an address, as some users may not have all address fields filled.
Only send the field value to Pipedrive if all variables have a value.
For the last two conditions, fallback values will be used if the condition is not met.
You can also configure the following settings:
👉 Prevents updating a field in Pipedrive if it already has a value. This is useful when you want to add new data without overwriting existing ones.
👉 Checks Pipedrive to see if the selected field value already exists in the current category (person, organization, or deal) to avoid creating duplicates.
This check will not be performed if the WooCommerce entity (user or order) is already synced and linked to a Pipedrive ID.
How the Plugin Determines Whether to Create or Update an Entity in Pipedrive
Case 1: The WooCommerce entity (order or user) has never been synchronized before
- The plugin first searches Pipedrive to check if the entity already exists (e.g., by looking for an existing email address for a person).
- If a match is found, the existing entity in Pipedrive is updated.
- If no match is found, a new entity is created in Pipedrive.
After that, the plugin links the WooCommerce entity to the newly created or updated entity in Pipedrive.
- You can configure which fields to search in the settings to prevent duplicates (see the Field Condition section).
Case 2: The WooCommerce entity has already been synchronized before
- If the entity was previously synced (e.g., when a user registered on your site), no search is needed. The plugin directly updates the entity in Pipedrive using the already linked Pipedrive ID.
- Example: WooCommerce user ID 153 is already linked to Pipedrive person ID 356.
- If the linked Pipedrive entity has been deleted, the plugin will search for it again based on the defined fields. If no match is found, a new entity will be created.
Still have unanswered questions? Ask us directly!
